
I have a magic ball that predicts the future! Well… actually… it doesn’t predict the future, it’s just a regular magic ball. Well… actually… it’s not magic, it works with physics! :) Click through to learn more about glass orbs and see some cool photos.
I was on Google+ one day a while ago and I saw some cool photos people had taken through glass orbs, they were tagged with #oculusimages and #orbaliciousness and I thought to myself “That’s a converging lens, it’s physics! how cool is that?!” :) The fact that the orb acts as a lens has two major implications:
1) The image through the orb will be inverted.
2) The focal plane of the orb (where you want to focus to take the picture) will be closer to the camera than the orb itself.
The fact that the image is inverted makes for funky photos, but the fact that the focal plane of the orb is closer to the camera than the orb itself means you can run into some trouble. If you’re getting too close to the orb but don’t have a macro lens your camera won’t be able to focus properly! But let’s not panic, I normally use my 50mm or my 18-55mm at 55mm (on a cropped sensor) and all is good :) By placing the orb’s focal plane at my lens’ minimum focusing distance I am able to fill the frame with my orb. I really like when the orb takes up most of the frame because then it feels like you’re capturing your own little privateworld inside it. Also, since the image inside the orb is going to be up-side-down I normally rotate the image in Lightroom afterwards to make it right-side-up.

So how much closer is the orb’s focal plane exactly? Let’s do a little bit of physics (easy peasy, I promise hehe). The focal length of a lens in air can be calculated with the following equation, called the “Lensmaker formula”:

Where f is the focal length of the lens, n is the refractive index of the lens, R1 and R2 are the radii of the surffaces of the lens and d is the thickness of the lens, as shown in the following figure:

In this case our lens is a glass ball, which means that both radii are the same and the thickness of the lens is the orb’s diameter.


If we use this to simplify our equation we obtain:


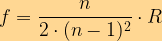
For an orb made out of glass, with refractive index n = 1.5 we have that:

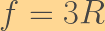
So in order to find out the focal length of your orb you just need to multiply it’s radius by 3, easy!! The orb I use the most is 60mm in diameter, which means it’s focal lenth is 90mm. I also, have another smaller orb which is 40mm in diameter, so it’s focal length is 60 mm.


As you can see, orbs of different sizes have different focal lenghts, which means that if I want to shoot the same image through both orbs at the same time I am going to have to place the smaller one slightly forward so that their focal plane matches, like shown below:

Here is an example of a photo with both my orbs, which I like to tag with #anasballs hehehehe :)

Have you taken any photos using an orb? I’d love to see them :) And to wrap this up, here is another of my favourite orbaliciousness photographs, if you’d like to see more (or even order some prints) check out my portfolio here.
Thank you for reading! xx Ana :)


[…] good combination I really reccommend is a glass orb and funky bokeh. Check out my previous post on this blog about the physics and photography of glass orbs. Glass orbs create an image of the […]
LikeLike
[…] personal favourites of mine have been my “Orbaliciousness” and “Bokehliciousness” posts, as the physics behind them is simple and elegant, […]
LikeLike